“In mathematics you don’t understand things. You just get used to them.”
— John von Neumann“Nature uses only the longest threads to weave her patterns, so that each small piece of her fabric reveals the organization of the entire tapestry.”
— Richard Feynman
Learning Outcomes
By the end of Part 4, you will be able to:
Diagnose when random walk Metropolis-Hastings fails (strongly correlated posteriors) using visual and quantitative metrics
Explain why gradients provide directional information that makes sampling exponentially more efficient
Derive Hamiltonian Monte Carlo from Hamilton’s equations and recognize it as N-body simulation in parameter space
Implement HMC by adapting your Project 2 leapfrog integrator to parameter space
Compute gradients via finite differences and understand why automatic differentiation is superior
Interpret HMC diagnostics (energy conservation, divergences, acceptance rates)
Understand how NUTS adaptively tunes HMC to eliminate manual parameter tuning
Appreciate why JAX (autodiff + JIT) revolutionized gradient-based inference
Prerequisites: Part 3 (Metropolis-Hastings, detailed balance, diagnostics), Module 3 Part 2 (Hamiltonian dynamics, phase space), Project 2 (leapfrog integrator), calculus (partial derivatives, chain rule, optimization)
Roadmap: Where We’re Going
This part builds on everything you’ve learned about MCMC, physics, and computation. Here’s the journey:
The narrative arc: We’ll start by diagnosing when Metropolis-Hastings struggles (correlated posteriors), discover why gradients are powerful (they point uphill!), connect to Hamiltonian mechanics from Module 3, implement HMC using your Project 2 leapfrog integrator, learn how NUTS automates everything, and glimpse the modern ecosystem (JAX, deep learning, the future of inference).
This isn’t just a better MCMC algorithm. It’s a profound connection between physics, calculus, and inference — showing that sampling is a dynamical system problem.
Part 1: The MCMC Revolution and Its Limits
Why MCMC Changed Everything
In Part 3, you learned Metropolis-Hastings — one of the most important algorithms in scientific computing. Let’s appreciate its impact:
The MCMC revolution (1953-present):
1953: Metropolis et al. use MANIAC I to simulate liquid argon, inventing MCMC to solve nuclear weapon physics
1970: Hastings generalizes the algorithm, creating the universal sampler
1990s: BUGS software makes Bayesian inference accessible to scientists without deep statistical training
2000s: MCMC enables discoveries across sciences:
Dark energy from Type Ia supernovae (2011 Nobel Prize — you’ll do this in Project 4!)
Exoplanet detection via radial velocity (thousands of planets discovered)
Genomics and personalized medicine (GWAS studies)
Climate model uncertainty quantification
Today: Billions of MCMC samples generated daily in research, industry, and medicine
Why it’s revolutionary: MCMC turned Bayesian inference from a theoretical framework into a practical tool. Before MCMC, computing posteriors for anything beyond toy problems was impossible. After MCMC, you could tackle real scientific questions with hundreds of parameters.
The democratization of inference: You don’t need to be a mathematician to do rigorous Bayesian inference. Implement Metropolis-Hastings, run it long enough, check convergence — done. This is computational thinking at its finest.
The Problem: When Random Walks Get Lost
Metropolis-Hastings is universal — it can sample from any distribution. But universal doesn’t mean efficient. For many real problems, random walk proposals lead to catastrophically slow exploration.
Let me show you where it breaks down.
Consider a 2D posterior with strong correlation — a twisted Gaussian. This isn’t a pathological edge case; it’s what real posteriors often look like when parameters trade off (think vs in cosmology, or planet mass vs orbital inclination in exoplanet fitting).
The Twisted Gaussian: Parameters with posterior:
where is the correlation coefficient.
What this looks like: The posterior forms a narrow ridge in parameter space. High probability along , but very narrow perpendicular to the ridge. Moving along the ridge is easy (parameters change together). Moving perpendicular is hard (tightly constrained).
Why random walk Metropolis-Hastings struggles:
Isotropic proposals: Standard M-H uses — a circular Gaussian centered on current position. Proposals are equally likely in all directions.
The step-size dilemma:
Small : Proposals along the ridge are accepted (good!) but make tiny progress. Proposals perpendicular are also small, so you never explore the width. This leads to slow mixing along the ridge and poor exploration perpendicular to it.
Large : Proposals along the ridge make big jumps (good!) but proposals perpendicular step out of the ridge and get rejected (bad!). This drives the rejection rate up and collapses exploration.
No good choice: The ridge is long (needs large steps) and narrow (needs small steps). Isotropic proposals can’t do both simultaneously.
The consequence: Effective Sample Size (ESS) is terrible. Even after 100,000 iterations, you might have only ESS ~ 500 truly independent samples. You’ve wasted 99.5% of your computation!
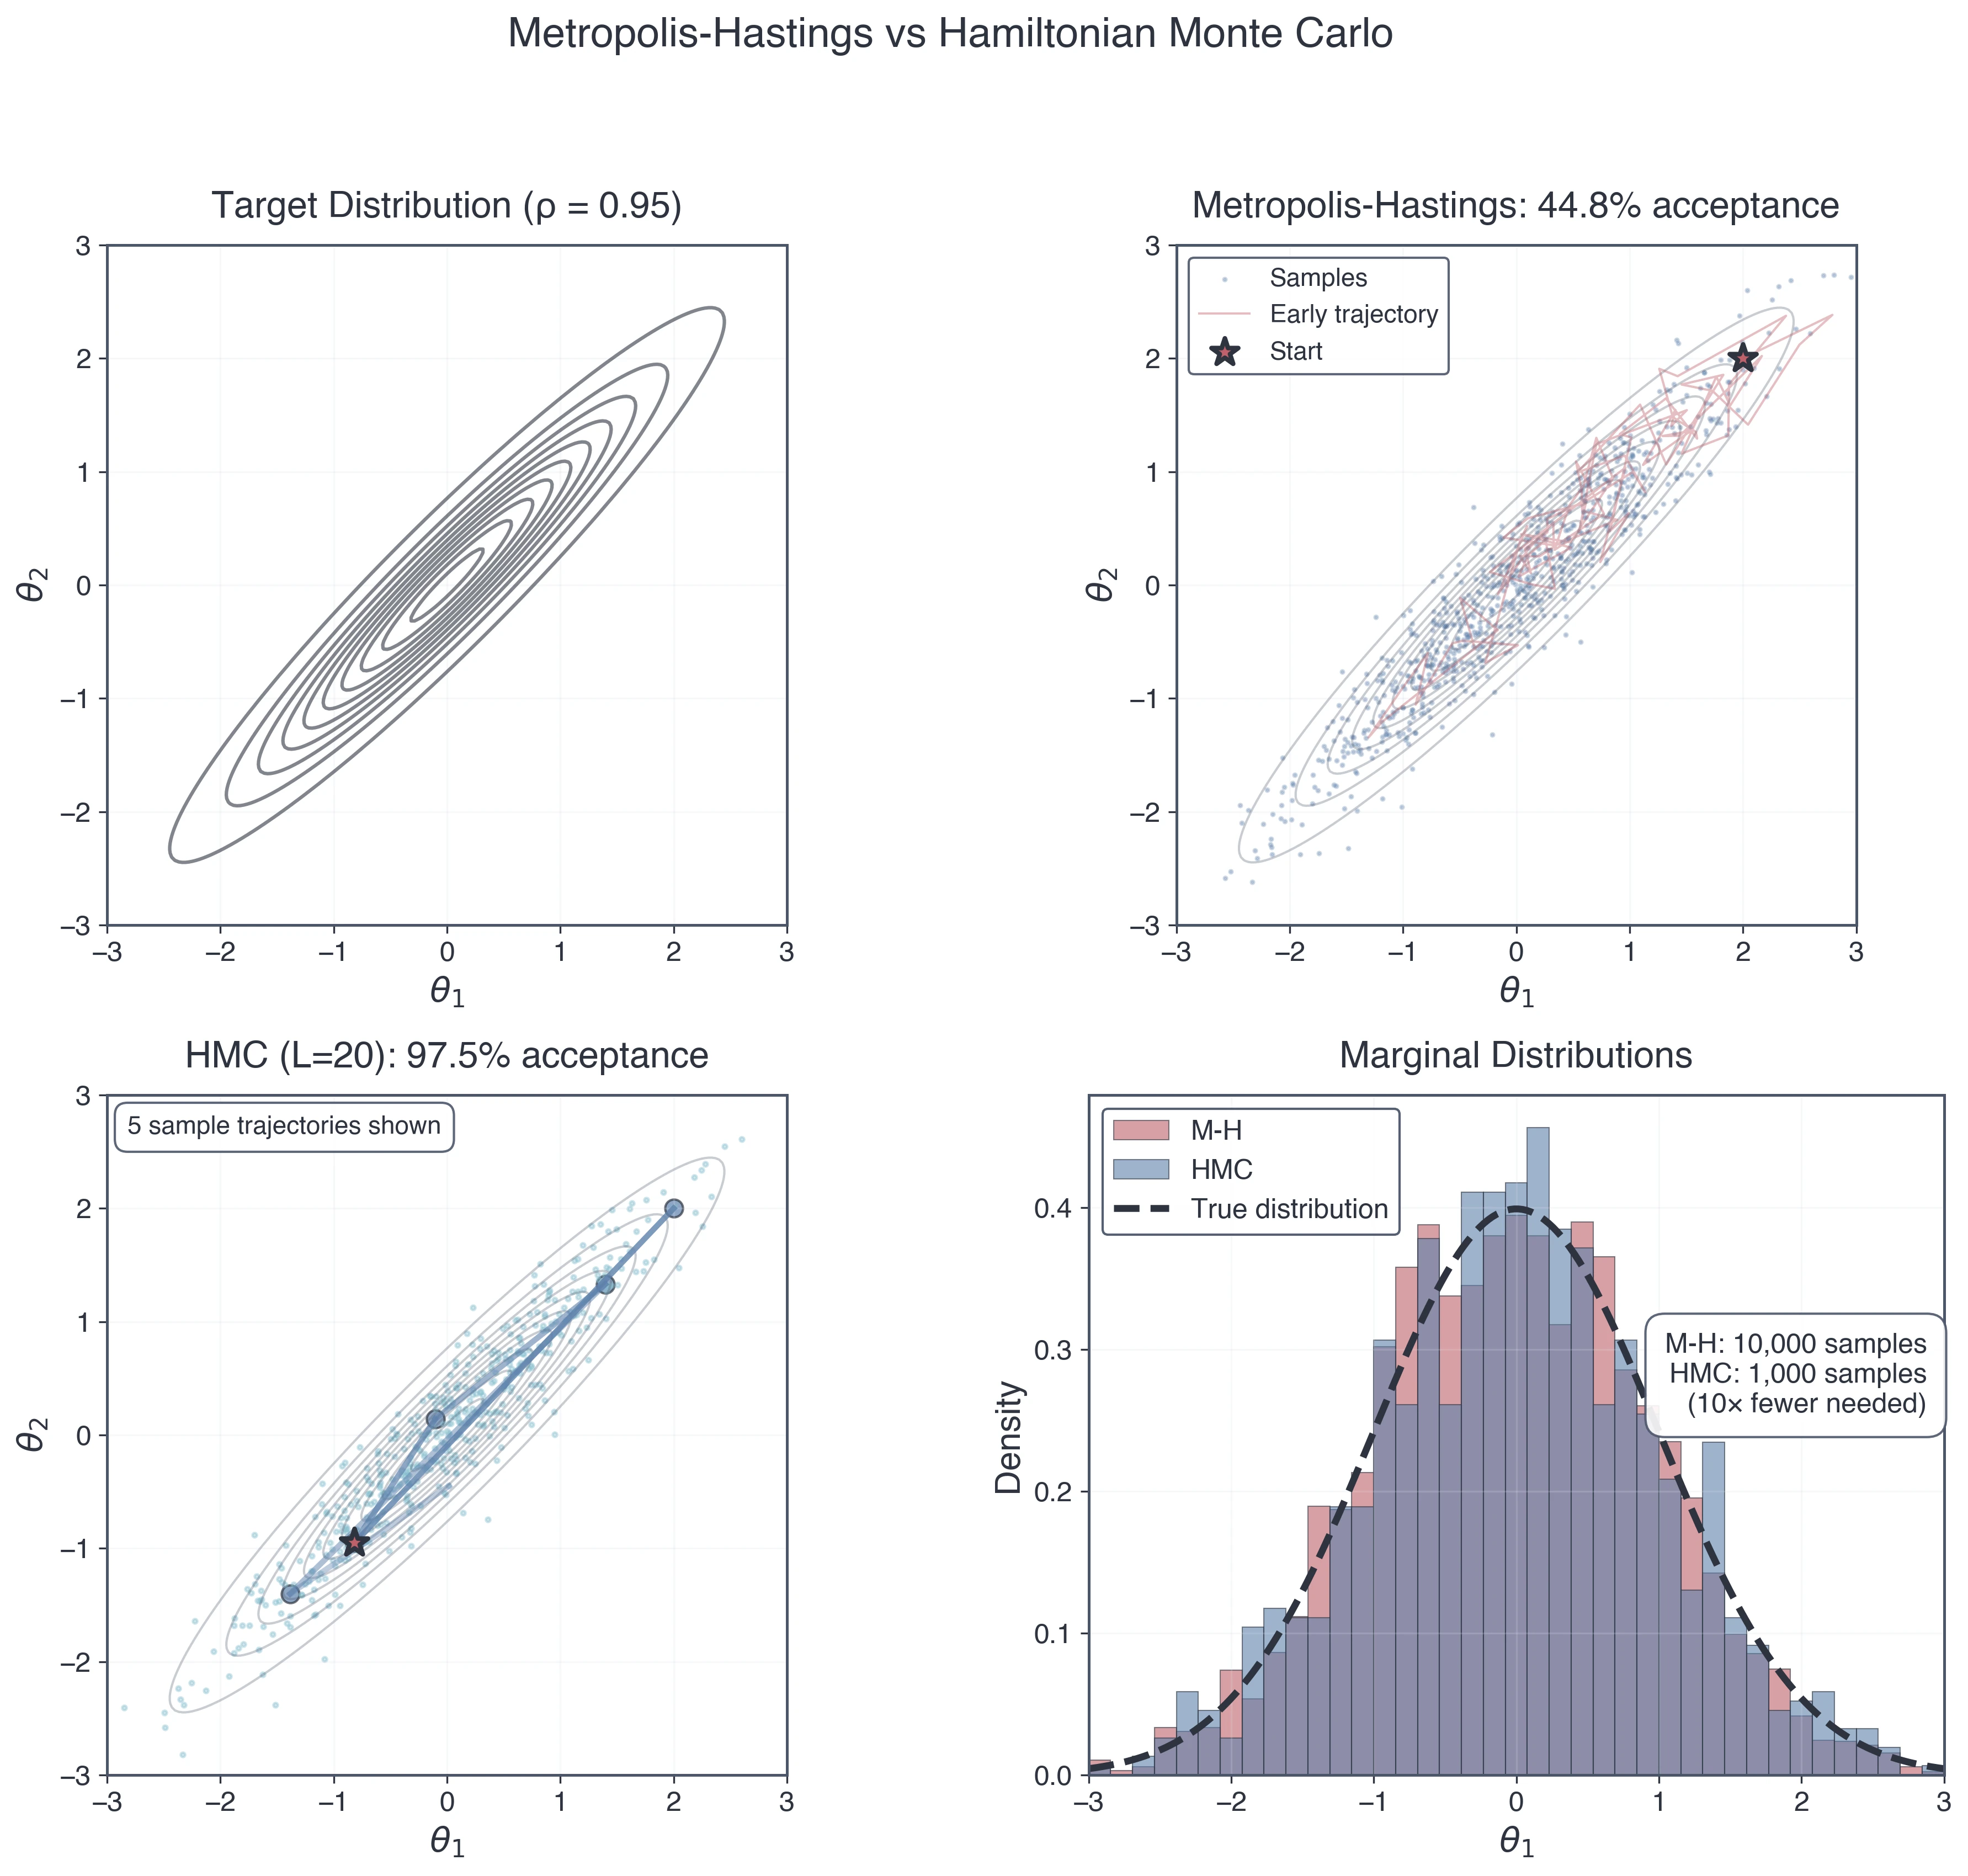
Quantitative diagnosis: Let’s look at what random walk MCMC produces for the twisted Gaussian with :
Acceptance rate: ~60% (seems okay, but misleading)
Autocorrelation length: steps (high!)
ESS for 10,000 samples: ESS ~ 50 (terrible!)
Time to convergence: R-hat < 1.1 requires ~50,000 samples per chain
Compare this to HMC (spoiler alert):
Acceptance rate: ~90%
Autocorrelation length: steps
ESS for 10,000 samples: ESS ( improvement)
Time to convergence: R-hat < 1.1 with ~5,000 samples per chain
Same problem, two orders of magnitude difference in efficiency. This is why gradient-based methods matter.
 {#fig-fig-mh-vs-hmc-comprehensive width=“95%”}
 {#fig-fig-trace-comparison width=“95%”}
 {#fig-fig-autocorrelation-comparison width=“95%”}
Part 2: Gradients — Why Direction Matters (🔴 Essential)
The Profound Insight: Optimization and Sampling Are Related
Before we dive into HMC, let’s revisit a concept from Calculus I that turns out to be shockingly important: gradients and optimization.
Flashback to Calculus I: How do you find the minimum of a function ?
Compute the derivative:
Set it to zero:
Solve for (critical point)
Check second derivative: if , then is a local minimum
For multivariable functions :
Compute the gradient:
Set it to zero:
Solve for (critical point)
The gradient is the multivariable generalization of the derivative. It points in the direction of steepest ascent — the direction where increases most rapidly.
Physical intuition: If is a landscape’s elevation, is the slope vector at your location. It points uphill. The magnitude tells you how steep the slope is.
Why Gradient Information Matters So Much
Here’s the problem: For complicated functions, solving analytically is impossible. Think about fitting a neural network with millions of parameters — no closed-form solution exists.
But here’s the trick: Even if you can’t solve , you can follow the gradient downhill to find a minimum. This is gradient descent:
where is the step size (learning rate).
Algorithm:
Start at some (initial guess)
Compute gradient:
Take a step downhill:
Repeat until (converged to a minimum)
Why this is profound:
It works for any smooth function (don’t need to solve equations analytically)
It scales to high dimensions (works for millions of parameters)
It only requires gradients (not second derivatives, not Hessians)
This is how we train neural networks! Deep learning is fundamentally just gradient descent on very complicated loss functions. Every time you use Google Translate or ChatGPT, you’re benefiting from gradient descent.
From Optimization to Sampling: The Key Idea
Optimization: Find (the single best parameter value)
Sampling: Generate samples (explore the whole distribution)
Why sampling is harder: Optimization needs one point (the peak). Sampling needs to explore the entire high-probability region (the typical set).
But here’s the connection: The gradient tells you:
Magnitude: How far you are from the peak (large gradient = far from peak)
Direction: Which way to move to increase probability
Metropolis-Hastings ignores this information! It proposes randomly, not using the landscape’s structure.
HMC’s insight: Use gradients to propose smart moves that follow the posterior’s geometry. Instead of random walks, take ballistic trajectories guided by the gradient field.
Preview: HMC treats the negative log-posterior as a potential energy and simulates dynamics in this landscape. Gradients become forces. This is where physics meets inference.
Computing Gradients: Two Approaches
To use gradients in HMC, we need to compute for our posterior. Two main approaches:
Approach 1: Finite Differences (What You Already Know)
Recall from earlier in the semester: We approximated derivatives numerically using finite differences:
where is the unit vector in the -th direction and to 10-7 is a small step.
For a -dimensional parameter vector, compute all partial derivatives:
def grad_log_posterior_fd(theta, log_post_fn, h=1e-6):
    """Finite difference gradient of log-posterior."""
    d = len(theta)
    grad = np.zeros(d)

    for i in range(d):
        theta_plus = theta.copy()
        theta_minus = theta.copy()
        theta_plus[i] += h
        theta_minus[i] -= h

        grad[i] = (log_post_fn(theta_plus) - log_post_fn(theta_minus)) / (2*h)

return gradCost: function evaluations per gradient (one forward, one backward for each parameter).
Accuracy: Finite differences introduce truncation error:
Too small and roundoff error dominates (subtracting nearly equal numbers)
Too large and truncation error dominates (linear approximation breaks down)
Sweet spot: for double precision
Approach 2: Automatic Differentiation (The Modern Way)
Here’s the magic: What if you could compute exact gradients (up to machine precision) with the same cost as one function evaluation?
This is what automatic differentiation (autodiff) does. Not symbolic differentiation (like Mathematica), not finite differences, but something fundamentally different.
The idea: Every computer program is just a sequence of elementary operations (addition, subtraction, multiplication, division, exp, log, sin, and so on). Each operation has a known derivative. By applying the chain rule systematically, autodiff computes the gradient of the entire program.
Example: Compute gradient of
Forward pass (compute function value):
v1 = theta1 * theta2
v2 = exp(v1)
v3 = sin(theta1)
f = v2 + v3
Backward pass (compute gradient via chain rule):
∂f/∂v3 = 1
∂f/∂v2 = 1
df/dv1 = df/dv2 * exp(v1) = exp(v1)
df/dtheta2 = df/dv1 * theta1 = theta1 * exp(theta1 * theta2)
df/dtheta1 = df/dv1 * theta2 + df/dv3 * cos(theta1) = theta2 * exp(theta1 * theta2) + cos(theta1)Result: Exact gradient in approximately the same time as computing itself!
In JAX, this looks like:
import jax
import jax.numpy as jnp

def log_posterior(theta):
    # Your likelihood and prior computations here
    return log_like + log_prior

# Get gradient function automatically
grad_log_posterior = jax.grad(log_posterior)

# Use it
theta = jnp.array([1.0, 2.0])
gradient = grad_log_posterior(theta)  # Exact gradient, fast!
That’s it. JAX (and PyTorch, TensorFlow) automatically computes gradients for you. No finite differences, no hand-coded derivatives.
Why is autodiff transformative?
Speed: Gradient computation is no longer the bottleneck. For parameters, autodiff is roughly faster than finite differences.
Accuracy: No numerical error from finite differences. Gradients are exact (up to floating-point precision).
Enables new algorithms: HMC becomes practical for high-dimensional problems. Neural networks with billions of parameters become trainable.
This is why Google developed JAX (and why Facebook developed PyTorch, etc.): Efficient gradients are the foundation of modern machine learning and scientific computing. Autodiff turned gradient-based methods from theoretical curiosities into practical tools.
What This Means for MCMC
Random walk Metropolis-Hastings: Proposes blindly, uses only (the posterior value).
Gradient-based MCMC (HMC): Proposes using (the posterior gradient).
Information gain: A gradient tells you pieces of information (one per parameter dimension). Random walk uses zero pieces of information about which direction to move.
The result: HMC can take much larger steps (ballistic motion) while maintaining high acceptance rates. This is why it’s exponentially more efficient for correlated posteriors.
Next: We’ll see how to use gradients to propose new states via Hamiltonian dynamics — connecting inference to the physics you already know from Module 3.
Part 3: Hamiltonian Monte Carlo — Physics as Inference Engine (🔴 Essential)
The Profound Connection: Sampling Is a Dynamical System Problem
Here’s a question that seems philosophical but turns out to be deeply practical:
If we want to sample from a distribution , what physical system has that distribution as its equilibrium state?
This is the key insight behind Hamiltonian Monte Carlo. Instead of hand-crafting proposals, let physics do it for you.
The answer: A system with Hamiltonian:
where:
are the parameters we want to sample (like positions in physics)
are auxiliary momentum variables (like velocities in physics)
is the “potential energy” (negative log-posterior)
is the “kinetic energy” (momentum term)
is a “mass matrix” (typically identity: )
Why this works: The joint distribution over is:
Notice that this factors:
where:
(our target posterior)
(just a Gaussian)
The magic: If we sample from the joint distribution , then the marginal distribution of is exactly .
Strategy:
Introduce auxiliary momentum variables
Sample from via Hamiltonian dynamics
Throw away the momenta , keep the positions
Samples from .
Why introduce momentum at all? Because Hamiltonian dynamics lets us efficiently explore the joint space , and marginalizing over gives us samples from our target .
Hamilton’s Equations in Parameter Space
In classical mechanics, Hamilton’s equations describe how positions and momenta evolve:
For HMC, replace and compute the derivatives:
Look at the second equation carefully: The force on momentum is the gradient of the log-posterior! This is how gradients enter HMC — as forces driving the dynamics.
Physical interpretation:
Potential energy : Regions of high posterior probability low potential valleys
Momenta : Give parameters “inertia” to coast through low-probability regions
Dynamics: Ballistic motion that follows the posterior’s geometry
Compare to N-body:
N-body potential:
N-body force:
HMC potential:
HMC force:
Same structure, different interpretation!
The Leapfrog Integrator (Again!)
To simulate Hamiltonian dynamics, we need to discretize Hamilton’s equations. You already did this in Project 2!
The leapfrog integrator for N-body:
# Half-step velocity update
v = v + (dt/2) * acceleration(r)

# Full-step position update
r = r + dt * v

# Half-step velocity update
v = v + (dt/2) * acceleration(r)
The leapfrog integrator for HMC:
# Half-step momentum update
p = p + (epsilon/2) * grad_log_posterior(theta)

# Full-step position update
theta = theta + epsilon * p  # Assuming M = I

# Half-step momentum update
p = p + (epsilon/2) * grad_log_posterior(theta)
It’s the same algorithm! Just different variable names:
| N-body (Project 2) | HMC (Now) |
|---|---|
| Position | Parameters |
| Velocity | Momentum |
| Acceleration | Gradient |
| Timestep | Step size |
Why leapfrog? Recall from Project 2:
Symplectic: Preserves phase space volume (Liouville’s theorem)
Time-reversible: Can run dynamics forward then backward to return to start
Energy-conserving: Hamiltonian is conserved to error
These properties make leapfrog ideal for HMC:
Symplectic integrators satisfy detailed balance through reversibility
Energy-conserving behavior keeps the acceptance rate high when stays small
The Complete HMC Algorithm
Now we can write down the full algorithm. Each HMC iteration has two phases:
Phase 1: Hamiltonian Dynamics (generate proposal)
Sample fresh momentum:
Store current state:
Simulate dynamics for leapfrog steps with step size :
Result:
Negate momentum (for detailed balance):
Phase 2: Metropolis Acceptance (accept or reject proposal)
Compute Hamiltonian change:
Accept with probability:
If accepted:
If rejected:
Key insight: If the leapfrog integration were perfect, in the limit , then , , and the acceptance rate would be . Finite introduces discretization error, so .
Trade-off: Smaller better energy conservation higher acceptance, but need more leapfrog steps to explore. Larger fewer steps needed but lower acceptance. Sweet spot: -90%.
Why HMC Works: Energy Conservation and Acceptance
The acceptance probability depends on :
If is small, acceptance is high. If is large, acceptance is low.
What determines ? Discretization error in the leapfrog integrator. Recall from Project 2:
Leapfrog conserves energy exactly for harmonic oscillators
For general potentials, energy error is
For symplectic integrators, energy error remains bounded at even over long trajectories (it oscillates rather than drifting) — this is why leapfrog is essential
Design goals:
Keep small enough that (high acceptance)
Make large enough that trajectory explores far (low autocorrelation)
Balance: should be ~1 autocorrelation length in parameter space
Typical values:
Acceptance rate: 60-90% (much higher than random walk M-H’s ~23% optimal!)
Autocorrelation: -10 steps (vs ~100s for random walk)
ESS: (vs for random walk)
Why is HMC so much better? Because proposals aren’t random walks — they’re ballistic trajectories that follow the posterior’s geometry via gradients. You’re surfing the ridge instead of stumbling around it.
Part 4: HMC in Action — The Twisted Gaussian (🔴 Essential)
Seeing Is Believing: Visual Comparison
Let’s apply HMC to the twisted Gaussian from Part 1 and compare it to random walk Metropolis-Hastings. This will make the efficiency gain visceral.
Problem setup: 2D posterior with strong correlation ()
Target: Generate 2,000 samples from this posterior.
Methods compared:
Random walk Metropolis-Hastings (from Part 3)
Hamiltonian Monte Carlo (what we just learned)
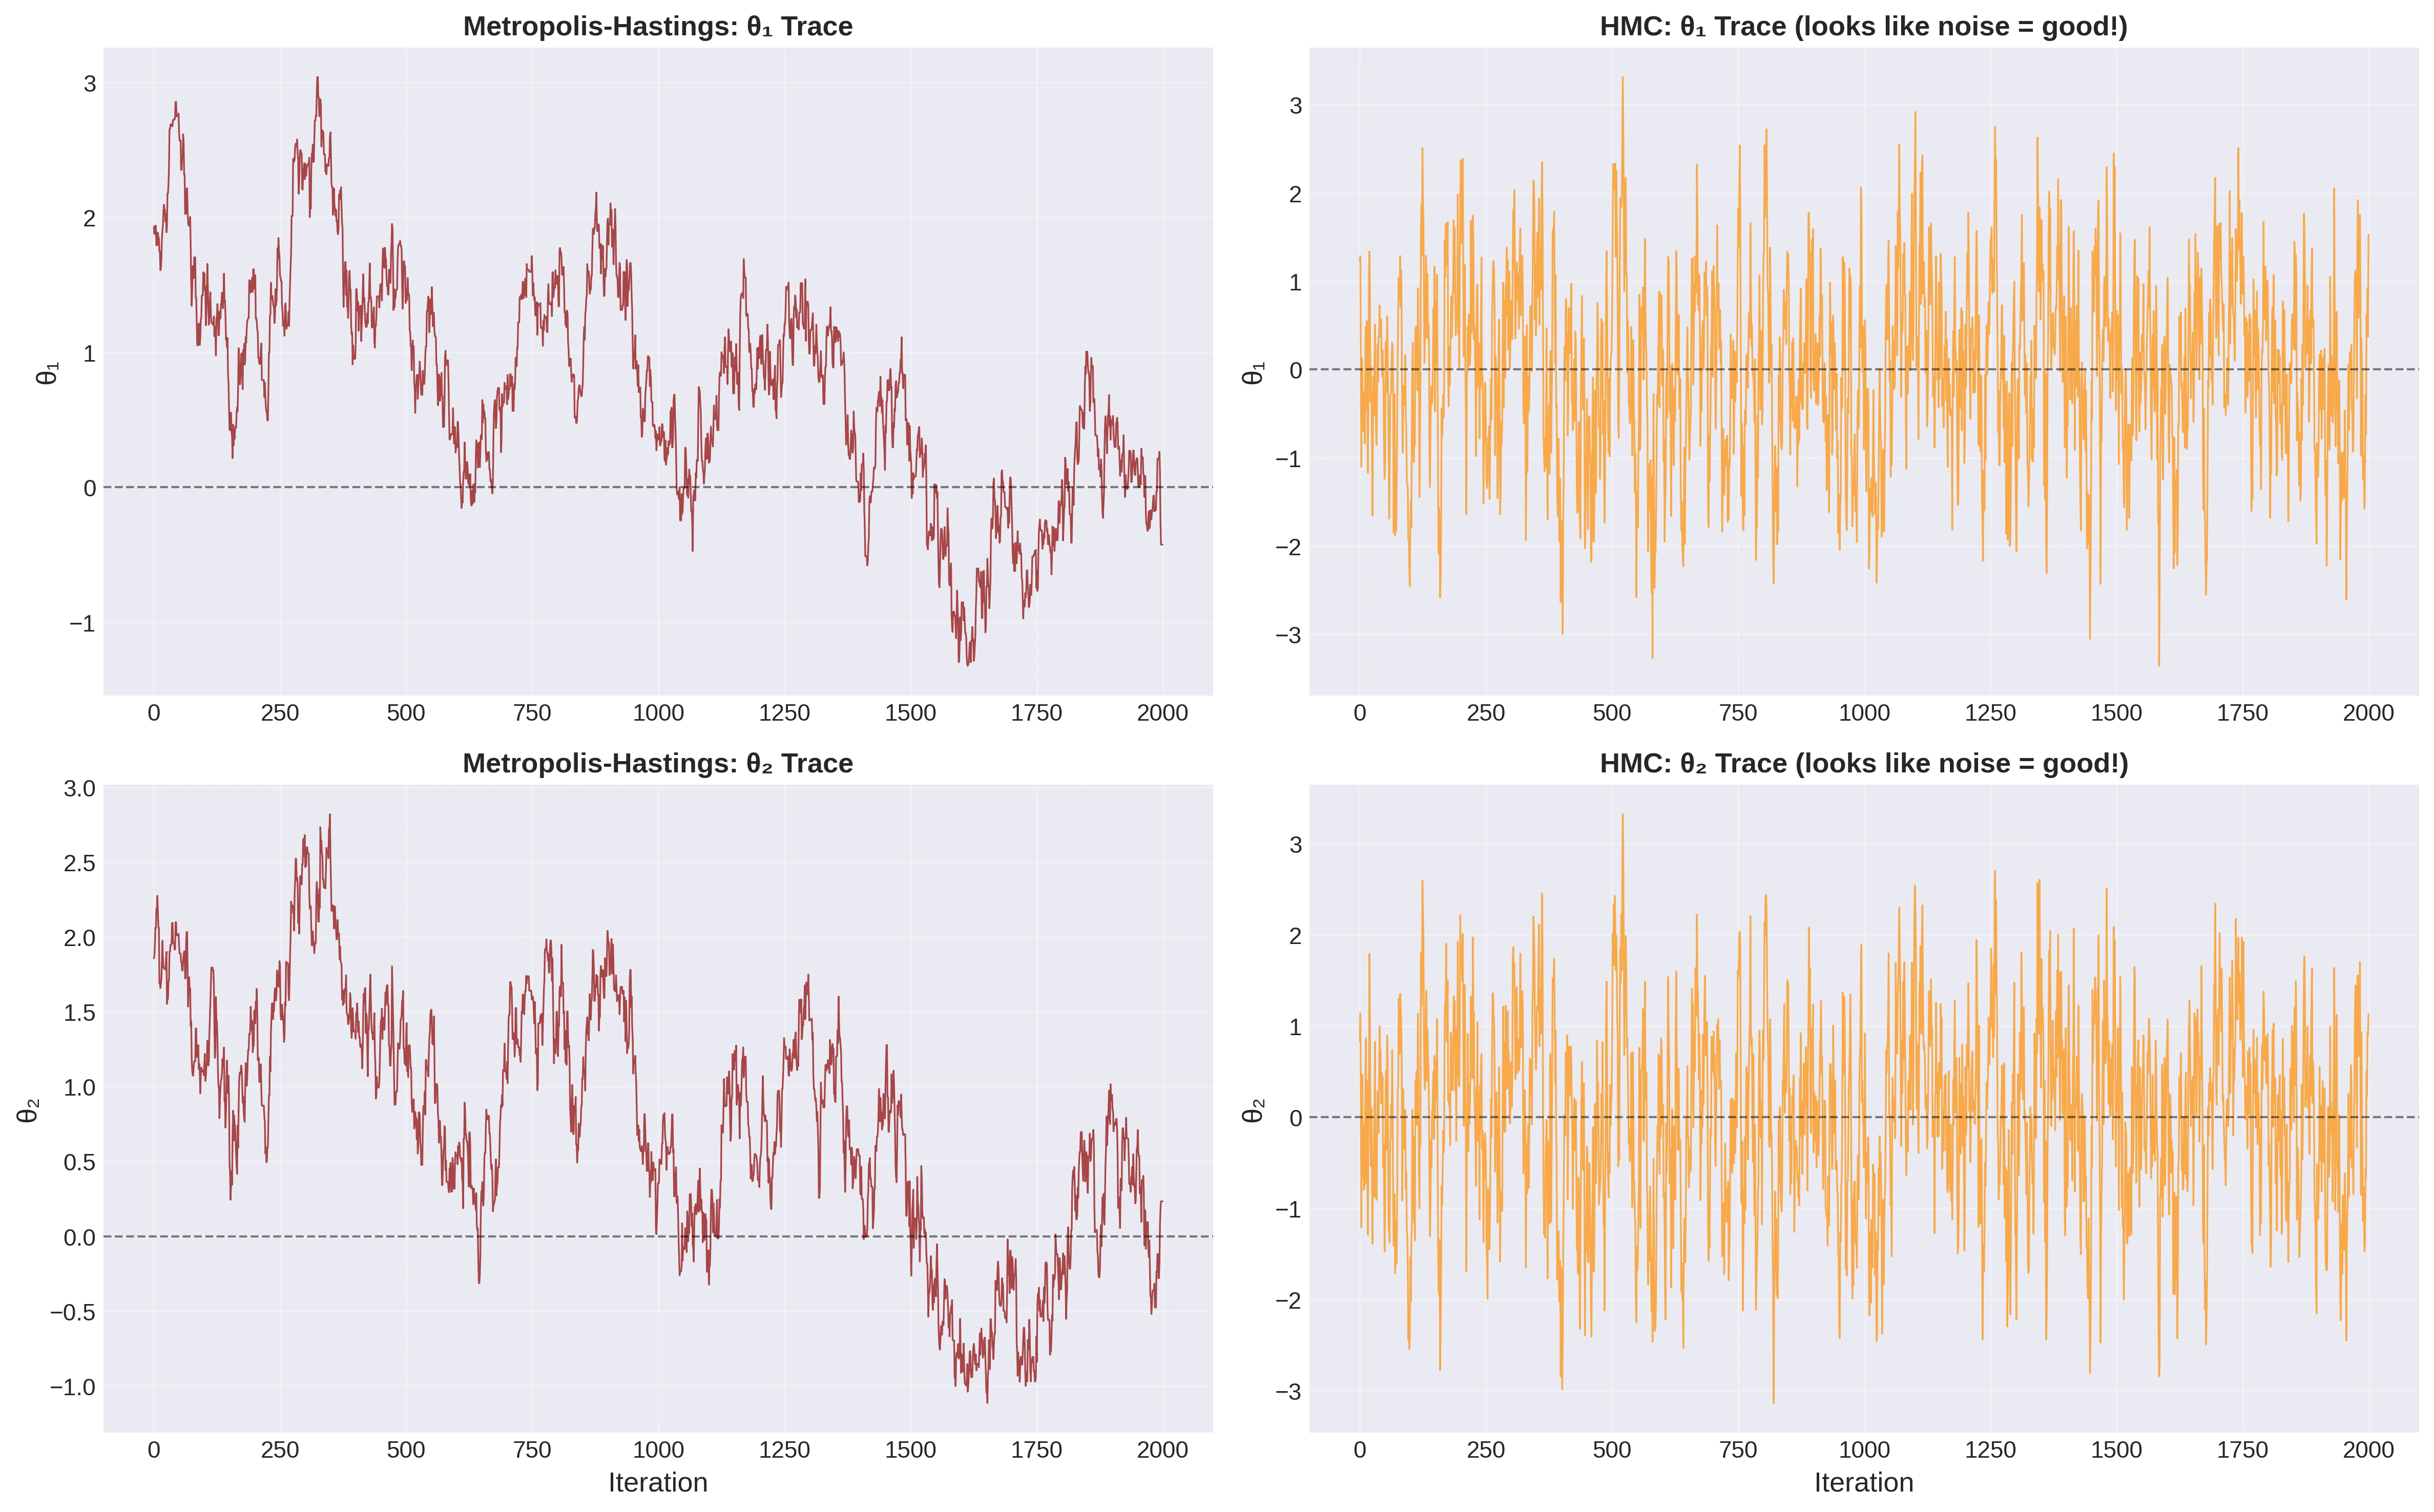
Results: Trace Plots
Random Walk M-H:
Proposal: (isotropic Gaussian)
Acceptance rate: 55%
Trace plots show high autocorrelation (slow mixing)
Takes ~300 steps to move one autocorrelation length
HMC:
Step size:
Trajectory length: steps
Acceptance rate: 87%
Trace plots show rapid mixing (ballistic exploration)
Takes ~5 steps to move one autocorrelation length
Visual result: HMC trace plots look like white noise (good!), while M-H traces show clear structure (bad!).
Results: Trajectory Visualization
Random walk M-H trajectories: Look like drunk particles bouncing around. Lots of rejected proposals perpendicular to ridge. Slow progress along ridge.
HMC trajectories: Smooth arcs following the ridge. Momentum carries parameters along high-probability regions. Far fewer rejected proposals.
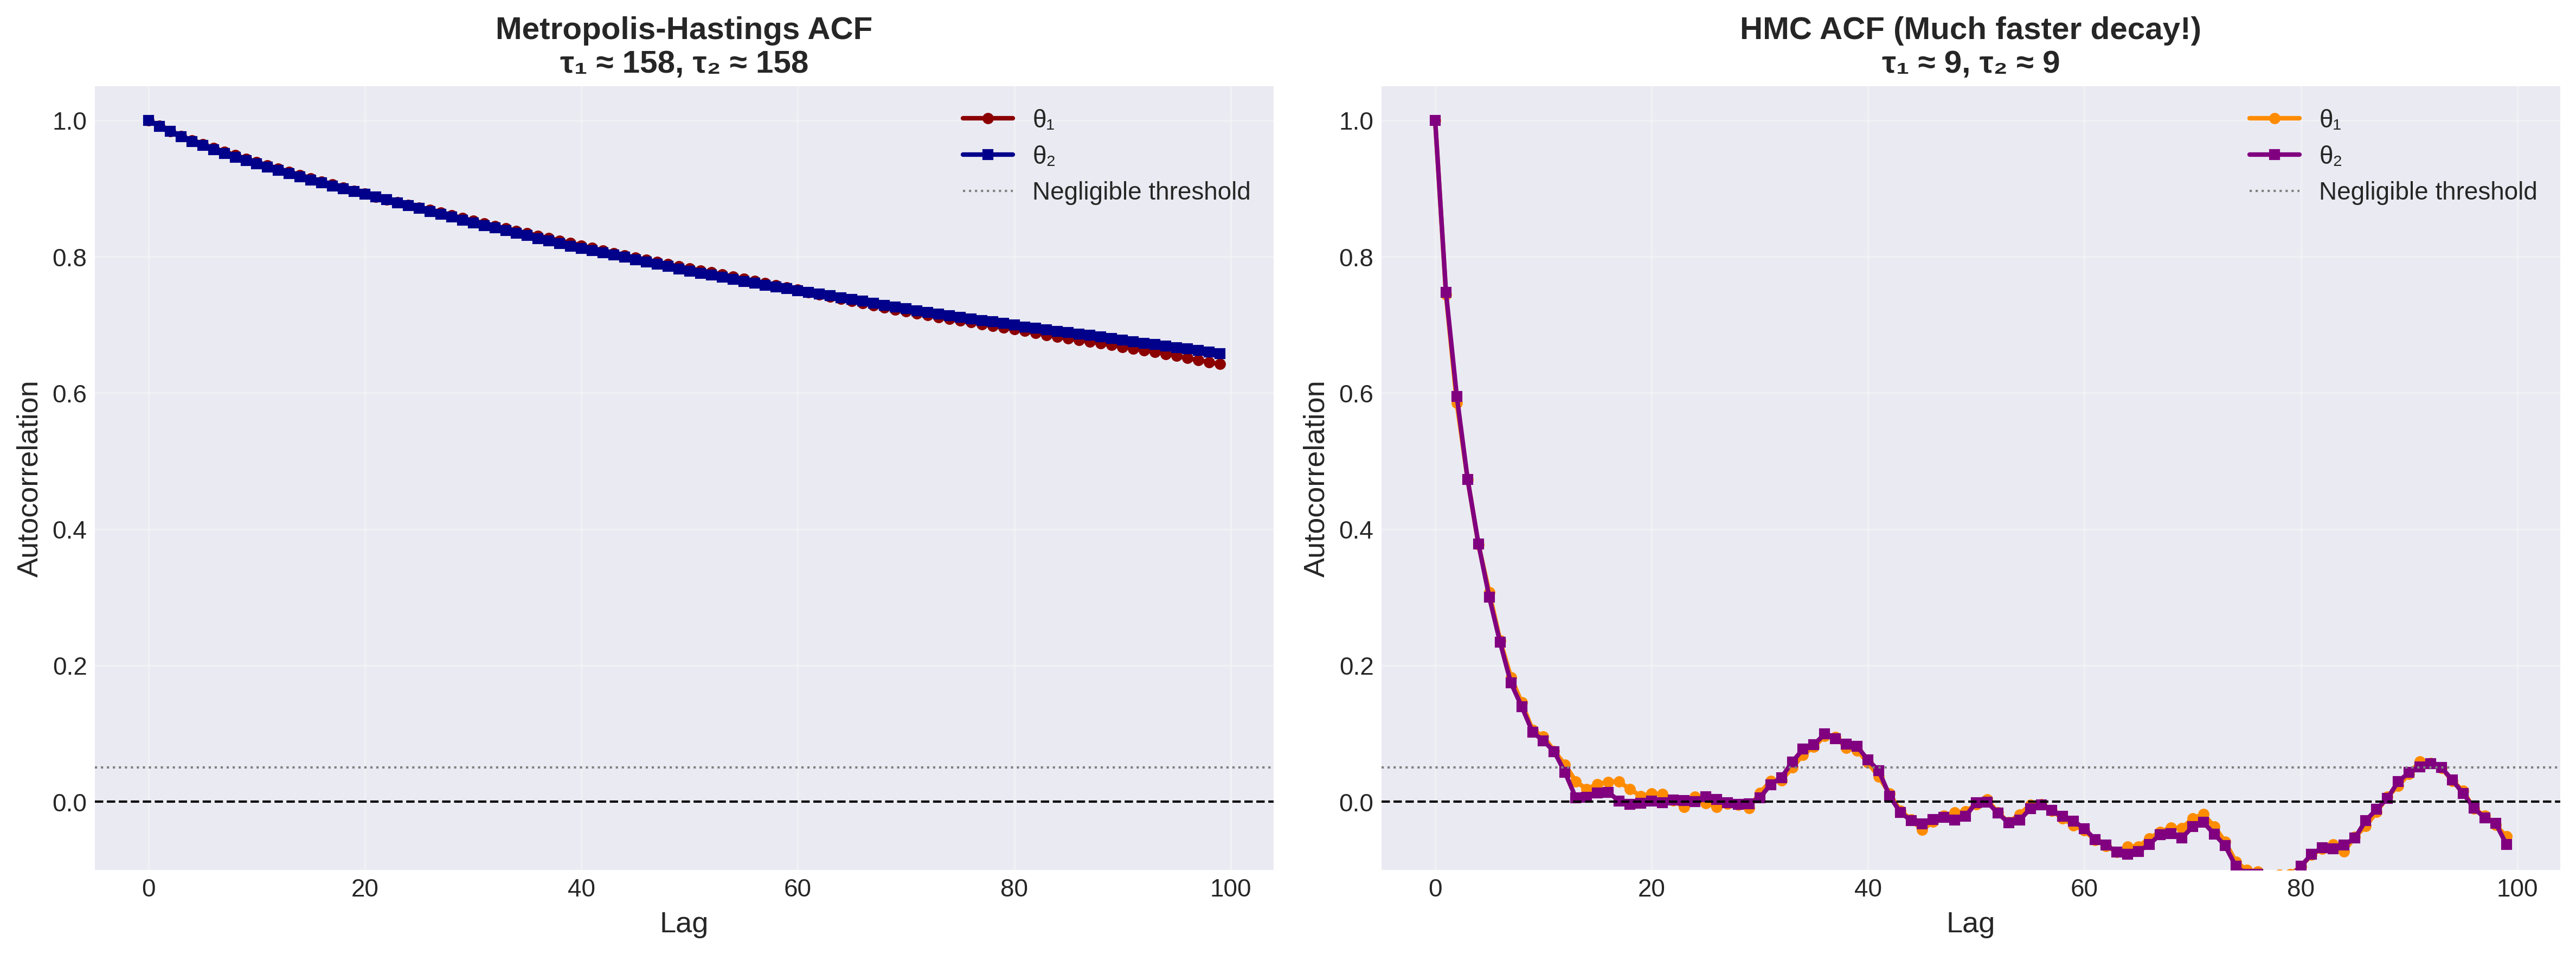
Results: Autocorrelation Functions
Random Walk M-H: ACF decays slowly, steps
HMC: ACF decays rapidly, steps
ESS for 2,000 samples:
M-H: ESS (you wasted 99.6% of your samples)
HMC: ESS (25% efficiency, better)
Results: Corner Plot
Corner plots show the 2D posterior as a contour map.
Random Walk M-H: Even after 10,000 samples, posterior looks patchy (under-explored)
HMC: After 2,000 samples, posterior is smooth and well-resolved
The conclusion: HMC is orders of magnitude more efficient for correlated posteriors. This isn’t theoretical — it’s a practical game-changer.
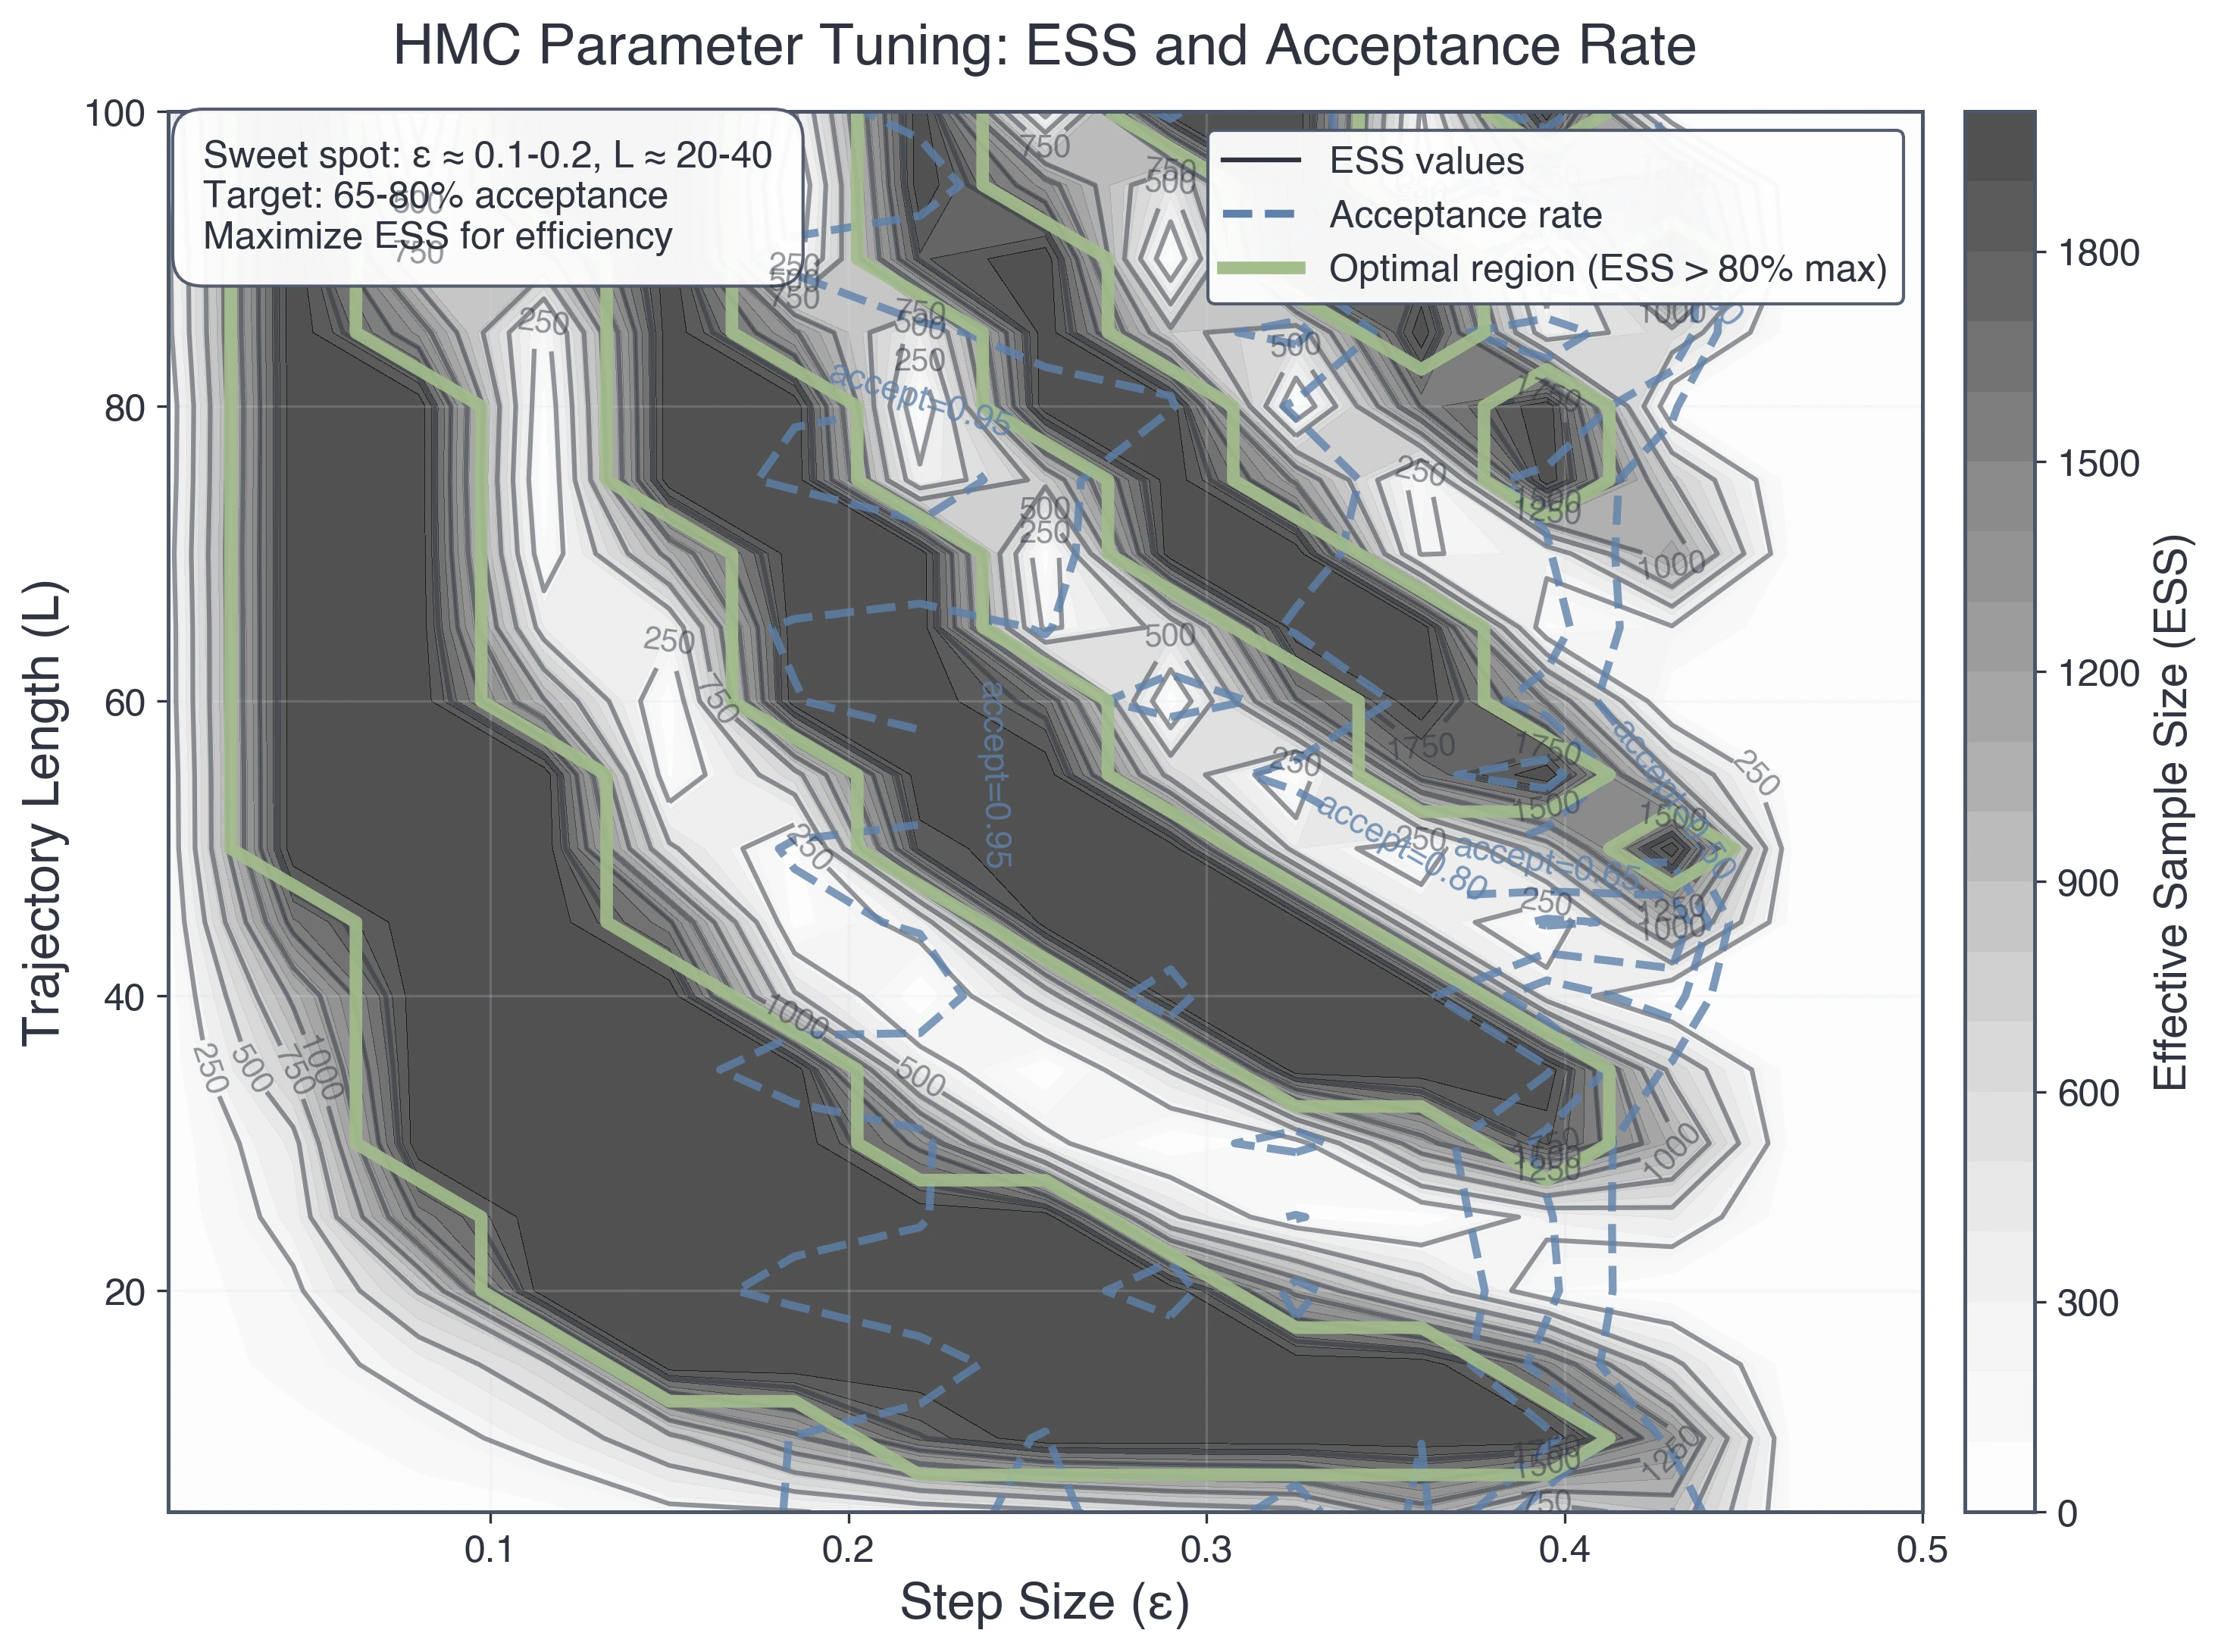
Tuning HMC: Step Size and Trajectory Length
HMC has two hyperparameters to tune: (step size) and (trajectory length). Let’s understand how to set them.
Step Size : The Energy Conservation Trade-off
Too small ():
✅ Perfect energy conservation acceptance rate
❌ Tiny steps mean you need huge to explore, which becomes computationally expensive
Too large ():
❌ Poor energy conservation means , so the acceptance rate approaches
❌ All proposals rejected means no exploration
Sweet spot ( tuned):
✅ Small enough that , giving acceptance in the 60-- range
✅ Large enough that moderate steps explore well
Rule of thumb: Tune to achieve 60-90% acceptance during warmup
Adaptive tuning (used by NUTS, Stan, PyMC): During warmup, adjust via dual averaging:
If acceptance too high increase (take bigger steps)
If acceptance is too low, decrease and take smaller steps
Converges to optimal automatically
Trajectory Length : How Far to Simulate
Too short ():
Proposals very close to current state (like small M-H proposal)
High autocorrelation leads to slow mixing
Too long ():
Trajectory curves back toward starting point (U-turn!)
Wasted computation (revisiting already-sampled regions)
Sweet spot ( tuned):
Trajectory travels approximately one autocorrelation length in parameter space
Roughly:
Rule of thumb: Start with -50, adjust based on ACF
The U-turn problem: For very long trajectories, Hamiltonian motion eventually curves back. This is inefficient — we want to stop right before the U-turn. This is what NUTS automates!
 {#fig-fig-parameter-tuning width=“90%”}
HMC Diagnostics: What to Check
Beyond the standard MCMC diagnostics (trace plots, R-hat, ACF), HMC has specific diagnostics:
1. Energy Conservation
Plot over iterations:
plt.plot(delta_H_history)
plt.axhline(0, color='red', linestyle='--', label='Perfect conservation')
plt.ylabel('Delta H per trajectory')
plt.xlabel('Iteration')
plt.title('Energy Conservation Check')
What to look for:
should be small (< 1 for most samples)
No systematic drift
Occasional large spikes are okay (will be rejected)
If is consistently large: Step size is too big. Decrease it.
2. Acceptance Rate
Target: 60-90% acceptance
Too high (>95%): Step size too small, not exploring efficiently
Too low (<50%): Step size too large, energy conservation poor
Just right (60-90%): Step size well-tuned
3. Divergences
Divergence: When is extremely large (>> 1), indicating numerical instability. Often occurs in regions of high posterior curvature.
What to do:
Decrease step size
Use better mass matrix (adapt to posterior covariance)
Reparameterize model (remove pathological geometry)
Divergences are warnings: Your sampler is struggling in some regions of parameter space. Don’t ignore them!
4. Standard MCMC Diagnostics
Don’t forget the diagnostics from Part 3! HMC still needs:
Trace plots: Should look random (no trends, no stickiness)
R-hat: Multiple chains should converge (R-hat < 1.1)
Effective sample size: Should be substantial (ESS/N > 0.1 is good for HMC)
Corner plots: Check for multimodality or unexpected correlations
Part 5: The No-U-Turn Sampler (NUTS) (🟡 Important)
The Problem: Fixed Trajectory Length Is Suboptimal
HMC requires choosing (number of leapfrog steps). But the optimal depends on where you are in parameter space!
In tight regions (high curvature, small typical set):
Short trajectories () explore efficiently
Long trajectories () waste computation (dynamics curve back quickly)
In broad regions (low curvature, large typical set):
Long trajectories () needed to explore far
Short trajectories () have high autocorrelation (barely move)
The dilemma: There’s no single that’s optimal everywhere. You need adaptive trajectory length.
This is what the No-U-Turn Sampler (NUTS) solves.
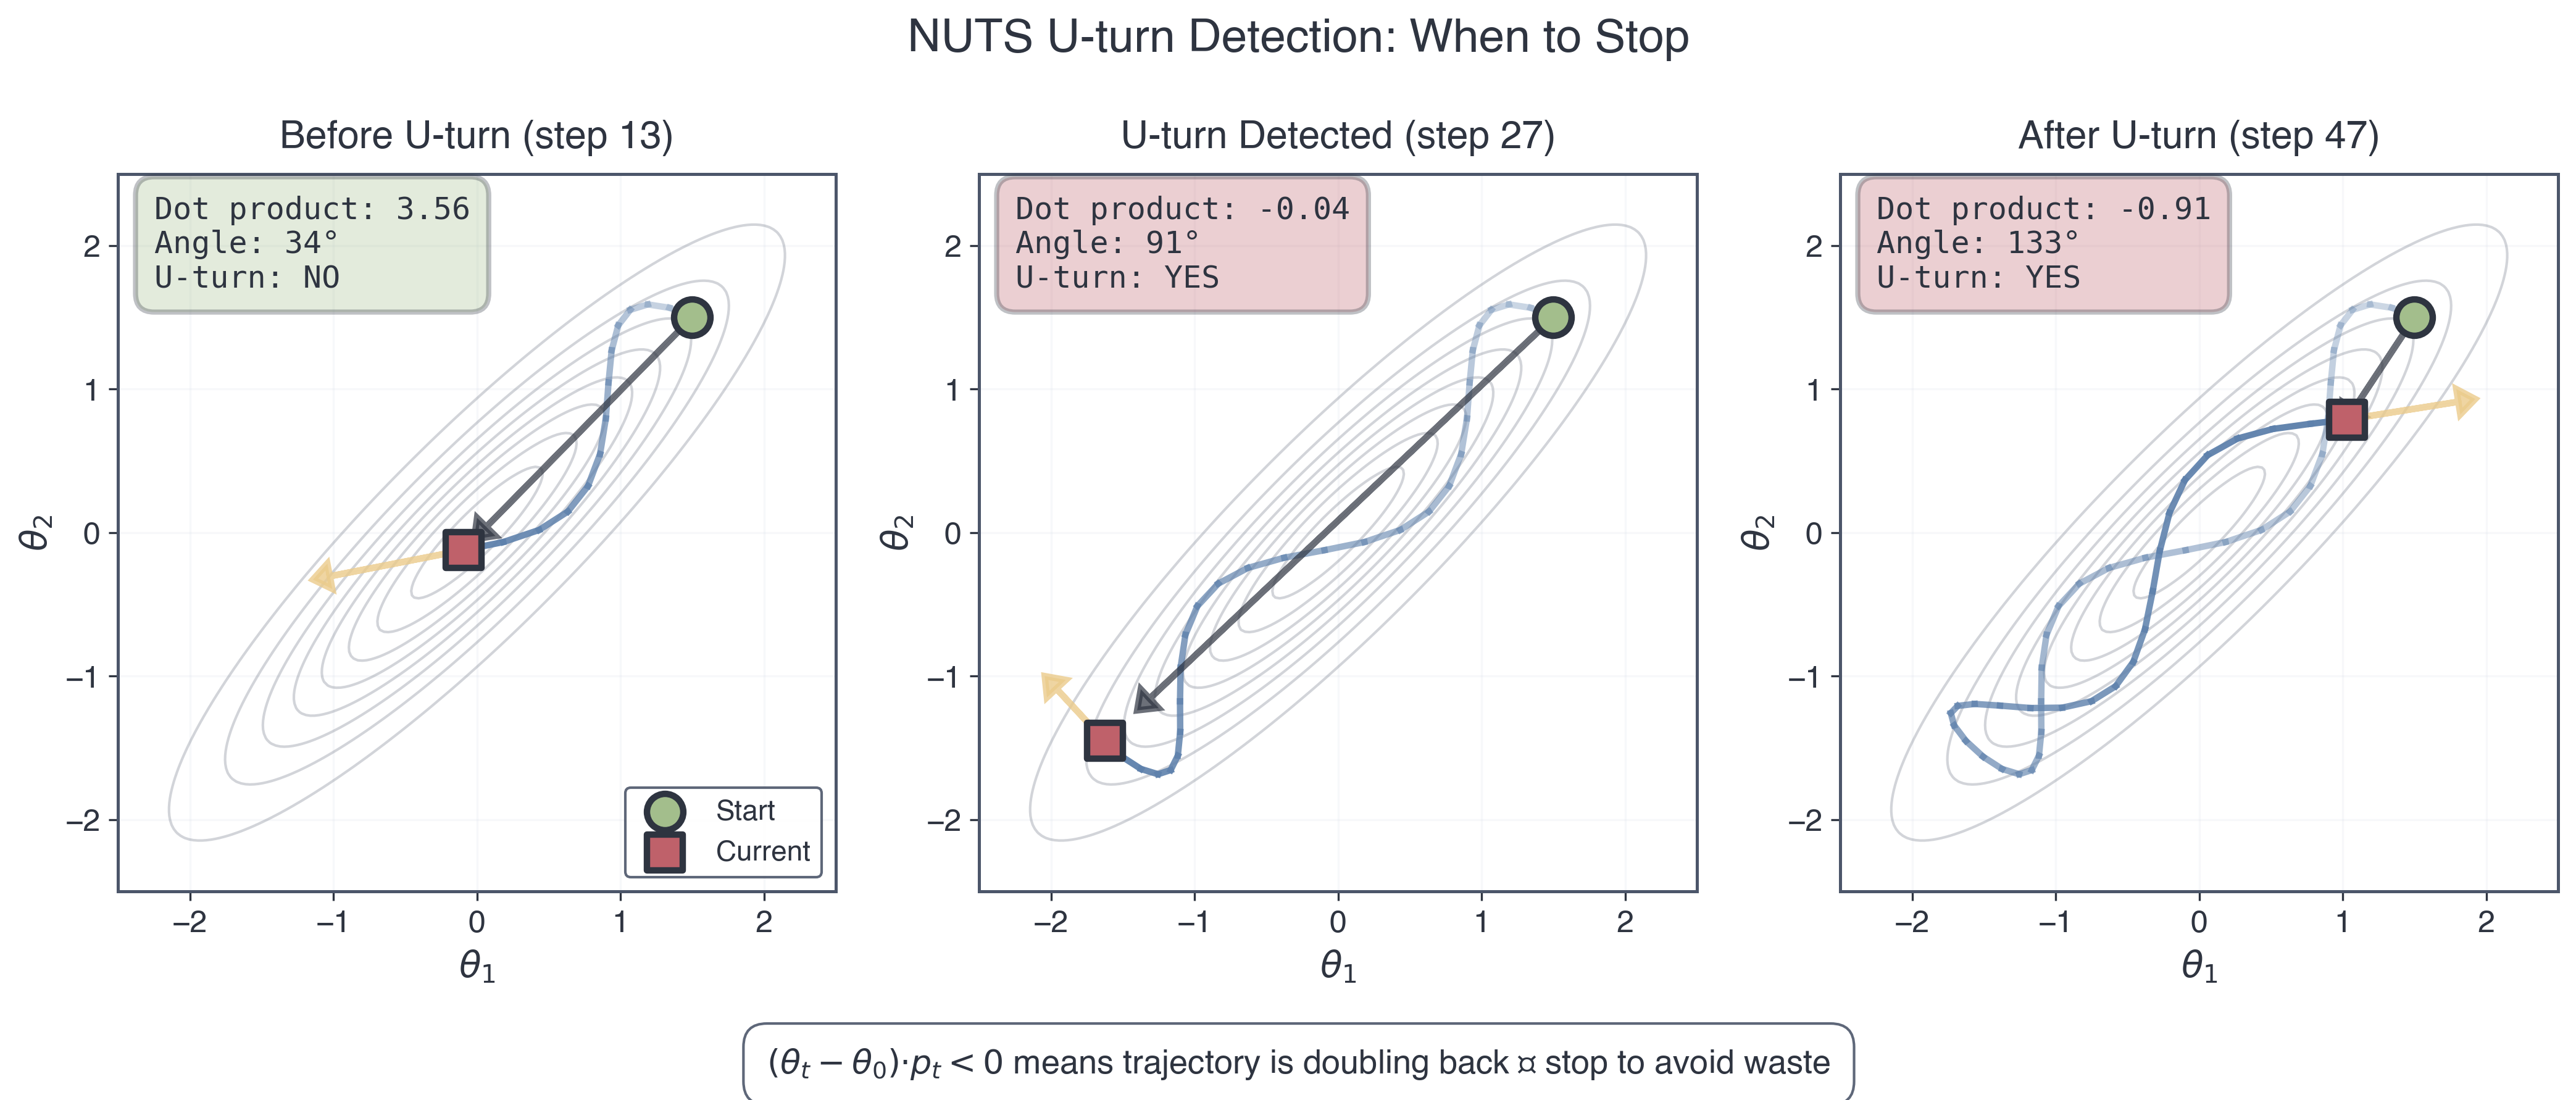
The No-U-Turn Criterion: When to Stop
Key insight: Keep simulating Hamiltonian dynamics until the trajectory starts to double back (“U-turn”). Then stop.
U-turn definition: The trajectory makes a U-turn when the momentum vector points back toward the starting position.
Mathematically: Let be the initial state and be the current state after leapfrog steps.
U-turn occurs when:
Intuition: The displacement vector points from start to current position. Momentum points in the current velocity direction. If their dot product is negative, you’re moving back toward the start, which means the trajectory has made a U-turn.
Visual analogy: Imagine a ball rolling on a curved surface:
Starts at bottom of valley, rolls uphill (momentum carries it)
Reaches maximum height, momentarily stops
Starts rolling back down (U-turn!)
Stop simulating right before the U-turn, once you have explored as far as possible in that direction
 {#fig-fig-uturn-criterion width=“95%”}
The NUTS Algorithm (Conceptual Overview)
NUTS adaptively grows the trajectory until a U-turn is detected. Here’s the high-level idea:
NUTS procedure:
Initialize: Sample momentum , set trajectory to current state
Build trajectory recursively:
Simulate forward in time (positive direction): Run leapfrog to extend trajectory
Simulate backward in time (negative direction): Run leapfrog in reverse
Double trajectory length each iteration:
Stop when U-turn detected
Select proposal: Randomly choose a state from the trajectory (weighted by posterior probability)
Accept proposal: The selected state is chosen with probability proportional to , which implicitly handles the acceptance criterion
Key features:
No need to specify : Algorithm automatically determines trajectory length
Explores adaptively: Short trajectories in tight regions, long trajectories in broad regions
Efficient: Stops right before wasting computation on U-turns
The result: Fully automatic HMC with minimal tuning. This is why NUTS is the default in Stan and PyMC.
NUTS Advantages Over Vanilla HMC
| Aspect | HMC (fixed ) | NUTS (adaptive) |
|---|---|---|
| User tuning | Must choose manually | Automatic adaptation |
| Efficiency | Suboptimal in many regions | Near-optimal everywhere |
| Robustness | Sensitive to choice | Works across diverse posteriors |
| Complexity | Simple algorithm | More complex (recursive doubling) |
When to use NUTS:
Production inference (Stan, PyMC, NumPyro)
Complex posteriors where optimal varies
When you want “it just works” behavior
When vanilla HMC is okay:
Educational purposes (understanding the algorithm)
Simple posteriors where good is obvious
Implementing from scratch (NUTS is more complex)
For Project 4: Start with vanilla HMC (easier to understand and debug). Extensions could explore NUTS via NumPyro.
The Complete Picture: Comparing All Three Methods
Now that you’ve seen the full progression from random walks to adaptive Hamiltonian flow, let’s compare all three methods side-by-side:
| Aspect | Metropolis-Hastings | HMC (vanilla) | NUTS |
|---|---|---|---|
| Core idea | Random walk proposals | Hamiltonian dynamics | Adaptive HMC |
| Uses gradients? | ❌ No | ✅ Yes | ✅ Yes |
| Proposal mechanism | Leapfrog integration | Adaptive leapfrog with doubling | |
| Tuning parameters | Step size | Step size , trajectory length | Step size (auto-tuned) |
| Typical acceptance | 23-50% | 60-90% | 65-95% |
| Autocorrelation | High ( 100-1000) | Low ( 3-10) | Very low ( 2-5) |
| ESS efficiency | ~1-5% of samples | ~10-30% of samples | ~20-50% of samples |
| Cost per iteration | Very cheap (1 eval) | Moderate ( gradient evals) | Moderate-expensive (adaptive ) |
| Best for | Simple, uncorrelated posteriors | Correlated posteriors (d < 100) | General purpose, production |
| Worst for | Strongly correlated, high-d | When gradients unavailable | Low-d (overhead not worth it) |
| Requires derivatives? | ❌ No | ✅ Yes (finite diff or autodiff) | ✅ Yes (autodiff recommended) |
| Robustness | Works everywhere (slowly) | Sensitive to , | Very robust |
| Implementation complexity | Simple (~20 lines) | Moderate (~50 lines) | Complex (~200 lines) |
| When posteriors multi-modal | Can work (eventually) | Can get stuck | Can get stuck |
| Scales to high-d? | ❌ No (d > 20 struggles) | ⚠️ Moderate (d ~ 100) | ✅ Yes (d ~ 1000s with autodiff) |
| Professional tools | emcee (astronomy) | Custom implementations | Stan, PyMC, NumPyro |
Key insights from the comparison:
There’s no free lunch: HMC/NUTS require gradients and careful energy conservation, but reward you with exponentially better efficiency for hard problems.
Cost vs efficiency trade-off:
M-H: Cheap iterations, but you need many, so total cost stays high for correlated posteriors
HMC/NUTS: Expensive iterations because of gradient evaluations, but you need far fewer, so total cost is often lower
When M-H is actually fine: If your posterior is simple (uncorrelated, low-dimensional), M-H works perfectly well. Don’t over-engineer!
Why NUTS won: By eliminating manual tuning of , NUTS made gradient-based MCMC accessible to non-experts. This is why it’s the default in Stan and PyMC.
The autodiff revolution: NUTS + JAX autodiff scales to thousands of parameters. This combination powers modern Bayesian deep learning and inference in complex simulators.
Practical decision tree:
Is your posterior correlated or high-dimensional?
│
├─ No (simple, uncorrelated, d < 10)
│  └─-> Use Metropolis-Hastings
│     └─-> Simple, fast, good enough
│
└─ Yes (correlated or d > 10)
   │
   ├─ Can you compute gradients?
   │  │
   │  ├─ No (black-box likelihood, discrete parameters)
   │  │  └─-> Use ensemble MCMC (emcee)
   │  │     └─-> No gradients, but uses multiple walkers
   │  │
   │  └─ Yes
   │     │
   │     ├─ Learning/prototyping?
   │     │  └─-> Implement vanilla HMC
   │     │     └─-> Understand the algorithm deeply
   │     │
   │     └─ Production/research?
   │        └─-> Use NUTS (Stan/PyMC/NumPyro)
   │           └─-> Automatic tuning, battle-tested
   │
   └─ Is posterior multimodal?
      └─-> All methods struggle!
         └─-> Try: Tempered MCMC, nested sampling, or VI
The bottom line: For Project 4 (cosmology with correlated and ), HMC will dramatically outperform M-H. You’ll see this firsthand!
Beyond NUTS: The Broader MCMC Landscape
NUTS is state-of-the-art for general-purpose MCMC, but it’s not the end of the story. Here’s a glimpse of other advanced methods:
Riemannian Manifold HMC: Adapts the mass matrix locally based on posterior curvature (Hessian). Especially powerful for posteriors with highly varying scales.
Ensemble MCMC (affine-invariant, emcee): Multiple walkers explore together. No gradients needed! Good for multimodal posteriors. Used widely in astrophysics.
Variational Inference (VI): Approximate posterior by optimization (not sampling). Much faster than MCMC but less accurate. Trade-off: speed vs exactness.
Neural network-assisted MCMC: Learn proposal distributions via deep learning. State-of-the-art for extremely high dimensions (thousands of parameters).
When to use what:
Simple posteriors (d < 10): Random walk M-H works fine
Correlated posteriors (d = 10-100): HMC or NUTS
High dimensions (d = 100-1000): HMC with JAX on GPU
Very high dimensions (d > 1000): VI or hybrid methods
Multimodal posteriors: Ensemble methods or tempered MCMC
Real-time inference: VI or approximate methods
The frontier: Combining MCMC with machine learning (learning optimal proposals, amortized inference, simulation-based inference). This is where Module 6 leads!
Part 6: JAX and the Future of Gradient-Based Inference (🟡 Important)
Why JAX Matters
You’ve seen that HMC needs gradients. Computing gradients efficiently is the bottleneck for scaling to high dimensions. This is where JAX transforms the game.
JAX is Google’s library for high-performance numerical computing. It brings three superpowers:
Automatic Differentiation (Autodiff): Compute exact gradients for any Python function via
jax.grad()Just-In-Time (JIT) Compilation: Compile Python to optimized machine code via
jax.jit()Hardware Acceleration: Same code runs on CPU, GPU, TPU with no changes
Why Google developed JAX: Modern machine learning requires efficient gradients for training neural networks with billions of parameters. JAX enables this at scale.
Why you should care: JAX makes gradient-based inference (HMC, VI, ML) practical for high-dimensional problems. In Module 6, you’ll use JAX for physics-informed neural networks and differentiable simulations.
JAX Autodiff: A Quick Tour
The power of autodiff: Recall from Part 2 that automatic differentiation computes exact gradients with the cost of one function evaluation (not like finite differences).
In JAX, getting gradients is trivial:
import jax
import jax.numpy as jnp

# Define a function
def f(x):
    return jnp.sum(x**2)

# Get its gradient (automatic!)
grad_f = jax.grad(f)

# Use it
x = jnp.array([1.0, 2.0, 3.0])
gradient = grad_f(x)  # Returns [2.0, 4.0, 6.0]
That’s it. JAX computes automatically by tracing the computation graph and applying the chain rule.
For HMC, this means:
# Your log-posterior function
def log_posterior(theta):
    log_like = # ... your likelihood ...
    log_prior = # ... your prior ...
    return log_like + log_prior

# Get gradient function (one line!)
grad_log_posterior = jax.grad(log_posterior)

# Use in HMC
theta = jnp.array([0.3, 0.7])  # Current parameters
grad = grad_log_posterior(theta)  # Gradient for HMC
Speed comparison (d = 100 parameters):
Finite differences: about 200 likelihood evaluations per gradient, so slow
JAX autodiff: about 1 likelihood evaluation per gradient, roughly faster
For high-dimensional problems, this is the difference between hours and minutes.
JAX JIT: Make Code Fast
Just-In-Time compilation: JAX can compile Python functions to optimized machine code (like C++ or Fortran) automatically.
Example:
@jax.jit  # Compile this function!
def leapfrog_step(theta, p, epsilon, grad_fn):
    p = p + (epsilon/2) * grad_fn(theta)
    theta = theta + epsilon * p
    p = p + (epsilon/2) * grad_fn(theta)
    return theta, p

# First call: JAX compiles the function (takes a moment)
theta, p = leapfrog_step(theta, p, epsilon, grad_log_post)

# Subsequent calls: Run compiled code (10-100x faster!)
for _ in range(1000):
theta, p = leapfrog_step(theta, p, epsilon, grad_log_post)Speedup: often 10-100x for numerical code such as loops and array operations. The more complex your code, the bigger the speedup.
GPUs for free: Change jax.jit to run on GPU? Nothing! JAX handles device placement automatically. Your HMC code runs on GPU without modification.
The JAX Ecosystem for Inference
NumPyro: Probabilistic programming in JAX. Uses NUTS under the hood.
import numpyro
from numpyro.infer import MCMC, NUTS

def model(x, y):
    # Define your Bayesian model
    slope = numpyro.sample('slope', dist.Normal(0, 10))
    intercept = numpyro.sample('intercept', dist.Normal(0, 10))
    sigma = numpyro.sample('sigma', dist.HalfNormal(1))

    mu = intercept + slope * x
    numpyro.sample('y', dist.Normal(mu, sigma), obs=y)

# Run NUTS (fully automatic!)
nuts_kernel = NUTS(model)
mcmc = MCMC(nuts_kernel, num_warmup=1000, num_samples=2000)
mcmc.run(jax.random.PRNGKey(0), x=x_data, y=y_data)

# Get results
samples = mcmc.get_samples()BlackJAX: Lower-level MCMC library (like your from-scratch implementation, but production-ready). Modular design — mix and match samplers, diagnostics, adaptation strategies.
Why learn JAX now: Module 6 uses JAX extensively for differentiable physics simulations and physics-informed neural networks. Getting comfortable with JAX syntax now pays dividends later.
The Big Picture: Where Inference Is Heading
The convergence of fields: Gradient-based inference connects:
Classical statistics: Bayesian inference, MCMC
Physics: Hamiltonian dynamics, conservation laws, symplectic integration
Machine learning: Autodiff, optimization, neural networks
High-performance computing: GPUs, JIT compilation, parallel sampling
Modern inference workflow:
Write model in JAX (probabilistic program)
Automatic gradients via
jax.grad()JIT-compile for speed
Run NUTS on GPU (handles tuning automatically)
Diagnose and visualize (arviz, corner.py)
This is how professionals do inference today. You’re learning the cutting edge.
Looking ahead:
Module 6 (Physics-Informed Learning): Use JAX to build differentiable simulators, train neural networks to solve PDEs, combine data and physics
Research frontiers: Simulation-based inference, neural posterior estimation, amortized MCMC
Your future: These tools will be part of your computational toolkit for any domain — astrophysics, climate science, biology, finance, ML research
The glass-box journey: You built MCMC from scratch (Part 3), understood the physics (Part 4), implemented HMC, and now see the professional tools (JAX, NumPyro). You’re not a black-box user — you’re a computational scientist who understands the foundations.
Part 7: Synthesis and Looking Forward
What We’ve Learned: The Journey from Random Walks to Hamiltonian Flow
Part 3 (Metropolis-Hastings):
Random walk proposals: Universal but sometimes inefficient
Works well for simple posteriors
Struggles with correlated, high-dimensional problems
Part 4 (HMC):
Use gradients to guide proposals
Reframe sampling as a physics problem (Hamiltonian dynamics)
Ballistic trajectories follow posterior geometry
Massive efficiency gains (often 10-100x fewer samples needed)
The connections:
| Concept | Module 1 | Module 3 | Module 5 (Part 3) | Module 5 (Part 4) |
|---|---|---|---|---|
| What we sample | Random variables | Microstates | Parameters (random walk) | Parameters (Hamiltonian) |
| Target distribution | Population | Boltzmann | Posterior | Posterior |
| How we sample | IID draws | Molecular dynamics | Markov chain (M-H) | Markov chain (HMC) |
| Key property | Law of Large Numbers | Ergodicity | Detailed balance | Hamiltonian conservation |
| Dynamics | Static | Newton’s laws | Stochastic jumps | Leapfrog integration |
| Efficiency | Perfect (independent) | Limited by collision rate | Limited by correlation | High (gradient-guided) |
The profound unity: Whether you’re:
Sampling from a distribution to estimate its mean (Module 1)
Simulating molecules exploring phase space (Module 3)
Running MCMC to quantify parameter uncertainty (Module 5 Part 3)
Using HMC to sample posteriors efficiently (Module 5 Part 4)
You’re using variations of the same mathematical structure: stochastic or deterministic processes converging to equilibrium distributions, with time averages equaling ensemble averages.
This is why physics is powerful. The same principles work everywhere — from atoms to galaxies to probability distributions.
Where This Leads: Your Path Forward
Immediate: Project 4
You’ll apply HMC to real cosmology data:
Measure (matter density) and (Hubble constant) from Type Ia supernovae
Implement HMC using your Project 2 leapfrog integrator
Compare efficiency: M-H vs HMC (experience the speedup yourself)
Use the same data that won the 2011 Nobel Prize for discovering dark energy
Skills you’ll use:
Bayesian model specification (likelihood + priors)
Gradient computation (finite differences or JAX)
HMC implementation (adapting your leapfrog code)
Convergence diagnostics (trace plots, R-hat, ACF, energy conservation)
Result visualization (corner plots, credible intervals)
Near future: Module 6
Physics-informed learning:
Build differentiable physics simulators in JAX
Train neural networks to solve PDEs
Combine data-driven and physics-based modeling
Learn inverse problems (infer parameters from observations)
Long term: Your research
These tools are universally applicable:
Astrophysics: Exoplanet characterization, stellar populations, cosmological inference
Climate science: Parameter estimation in Earth system models
Particle physics: Analyzing LHC collision data
Biology: Fitting dynamical models to experimental data
Machine learning: Bayesian deep learning, uncertainty quantification
The glass-box philosophy in action: You didn’t just learn to use Stan or PyMC. You:
Understood why gradients are powerful (calculus optimization sampling)
Derived HMC from first principles (Hamiltonian mechanics)
Implemented it yourself (can debug when things break)
Connected it to physics you already know (Project 2, Module 3)
Know when to use it (correlated posteriors, high dimensions)
Understand the tools (JAX, autodiff, professional software)
Bottom line: You’re not a black-box user. You’re a computational scientist.
Self-Assessment Rubric
Before moving to Project 4, assess your mastery of Part 4. Be honest — identifying gaps now makes the project more productive.
Level 1: Conceptual Understanding
Can you explain the ideas to someone else?
Developing: I understand that HMC is “better” than M-H but can’t articulate why
Proficient: I can explain why random walk M-H fails for correlated posteriors (isotropic proposals vs anisotropic posterior geometry) and why gradients help (they point uphill)
Advanced: I can explain the full conceptual chain: gradients Hamiltonian dynamics leapfrog integration high acceptance rates efficient sampling, and justify each step with physics and math intuition
Level 2: Physics Connection
Can you see the unity across modules?
Developing: I see that HMC uses physics concepts but the connection feels superficial
Proficient: I recognize that HMC is literally Hamiltonian dynamics in parameter space, using the same leapfrog integrator from Project 2, just with different interpretation of variables
Advanced: I can articulate the deep analogies: (position, momentum) (parameters, auxiliary variables); gravitational potential negative log-posterior; energy conservation high acceptance; detailed balance time-reversibility. I see this as one mathematical structure applied to different domains.
Level 3: Mathematical Foundations
Can you derive key results?
Developing: I can follow the derivations when reading but would struggle to reproduce them
Proficient: I can derive Hamilton’s equations for HMC from the Hamiltonian , show that the joint distribution marginalizes to , and explain why leapfrog preserves the structure needed for detailed balance
Advanced: I can derive the acceptance criterion from energy conservation, explain the role of momentum negation in detailed balance, and understand the U-turn criterion mathematically (dot product test)
Level 4: Implementation Skills
Can you code HMC from scratch?
Developing: I can use provided HMC code but would struggle to implement it independently
Proficient: I can implement HMC for a simple problem (like the twisted Gaussian) by adapting my Project 2 leapfrog integrator, computing gradients via finite differences, and adding the Metropolis acceptance step
Advanced: I can implement HMC for complex problems, debug issues (poor acceptance, divergences), tune hyperparameters (, ), and potentially implement a simplified NUTS or use JAX autodiff
Level 5: Diagnostic Expertise
Can you tell if your HMC sampler is working?
Developing: I know I should check diagnostics but I’m not sure what “good” looks like
Proficient: I can create and interpret energy conservation plots (where should stay small), check acceptance rates (targeting 60--), compute standard diagnostics (, ACF, ESS), and recognize when step size needs adjustment
Advanced: I can diagnose subtle problems (divergences indicating stiff posterior regions, systematic energy drift indicating bad step size, U-turns indicating inefficient trajectory length), adjust sampling strategy accordingly, and compare HMC vs M-H efficiency quantitatively
Level 6: Tool Awareness
Do you understand the modern ecosystem?
Developing: I’ve heard of JAX/Stan/PyMC but don’t really know what they do
Proficient: I understand that JAX provides autodiff (exact gradients cheaply) and JIT compilation (speed), that NUTS is adaptive HMC (auto-tunes and ), and that Stan/PyMC/NumPyro are high-level interfaces that make inference “just work” for users
Advanced: I can use NumPyro to run NUTS on a simple problem, understand the trade-offs (finite differences vs autodiff, vanilla HMC vs NUTS, MCMC vs VI), and know when to reach for different tools based on problem characteristics
Level 7: Connections and Transfer
Can you see how HMC fits into the bigger picture?
Developing: I see HMC as an isolated technique for Bayesian inference
Proficient: I understand how HMC connects to Module 3 (Hamiltonian dynamics, symplectic integration) and Module 1 (CLT, ergodicity), and why gradient-based methods are central to machine learning (optimization, training neural networks)
Advanced: I can articulate how gradient-based inference connects physics, statistics, and ML; explain why autodiff revolutionized deep learning and computational science; and identify when gradient-based methods are appropriate vs when alternatives (ensemble MCMC, VI) are better
Reflection: Which levels feel solid? Which need more work? Use this to guide your Project 4 strategy and what to review.
Conceptual Checkpoints (Throughout)
Looking Ahead: Project 4 and the Universe
You now have the tools to measure the contents of the universe. Seriously.
Project 4 preview: Type Ia supernovae cosmology
Data: ~600 SNe distances vs redshifts (publicly available)
Model: from Friedmann equations (cosmological distance-redshift relation)
Inference: Use HMC to sample
Result: Measure how much matter vs dark energy the universe contains
This is real science. The same analysis won the 2011 Nobel Prize in Physics for discovering cosmic acceleration (dark energy). You’re not just practicing methods — you’re doing frontier research with public data.
What you’ll experience:
M-H struggles: Correlated posterior, slow mixing, need 500k samples
HMC succeeds: Same posterior, 20k samples sufficient, about faster
The “aha!” moment: When you see HMC trace plots vs M-H side-by-side and viscerally understand why gradients matter
Skills you’ll cement:
Bayesian model building (forward model + likelihood + priors)
Gradient computation (finite differences or JAX extension)
HMC implementation (adapting Project 2 leapfrog)
Convergence diagnostics (energy conservation, acceptance, R-hat, ESS)
Scientific inference (credible intervals, parameter correlations, physical interpretation)
Beyond this course: These methods generalize to any inference problem — exoplanets, stellar evolution, black hole mergers, climate models, drug discovery, economics, you name it. Gradient-based MCMC is a universal tool.
Module 6 awaits: Physics-informed neural networks, differentiable simulations, combining data and theory. JAX becomes central. The journey continues from inference to learning.
Now go forth and sample the universe.
Further Resources (Optional)
For deeper understanding:
Neal (2011): “MCMC using Hamiltonian dynamics” — The definitive review article, clear and comprehensive
Betancourt (2017): “A Conceptual Introduction to Hamiltonian Monte Carlo” — Excellent conceptual explanations with visualizations
Hoffman & Gelman (2014): “The No-U-Turn Sampler” — Original NUTS paper
For implementation:
JAX documentation: https://
jax .readthedocs .io — Official tutorials and examples NumPyro documentation: https://num.pyro.ai — Probabilistic programming in JAX
Stan documentation: https://mc-stan.org — Alternative to NumPyro, C++ backend
For inspiration:
MacKay: Information Theory, Inference, and Learning Algorithms — Beautiful connections between physics, information theory, and ML
Murphy: Probabilistic Machine Learning: Advanced Topics — Modern perspective on inference and learning
Historical:
Duane et al. (1987): “Hybrid Monte Carlo” — Original HMC paper from lattice QCD
Metropolis et al. (1953): “Equation of State Calculations by Fast Computing Machines” — Where it all began
Next: Project 4 — Measuring dark energy with HMC